Thanks. It's one of those thin walled light tube types from Hong Kong via Ebay branded "Autobahn88".
It uses an intercooler with 'fin and tube' type intercooler vs. the 'bar and plate' design. Both have advantages but either will usually do for most street applications without noticing any differences. Lots has been written of several forums on the pros and cons of each; i like the fin and tube for better airflow through to the rad.
Core size is 600mmx300mmx77mm ( 23.7 inch x 11.77 inch x 3.1 inch) ,
End to end it's 780mm and Inlet/Outlet 75mm (3 inch) O/D. Wt. 9kg on the vehicle.
The manufacturer claims an 'ultra low pressure drop 0.5-1psi at 23psi' (Normal Bar and Plate 2.8- 4 psi at 23 psi) and good to 650hp on the efficiency.
It's still good after a year only requiring normal clamp re-tightening. The three bolts at the turbo discharge joint were tightened with a combination of sockets and extension plus a short box end for one of them.
With the battery relocated, there was a lot more space available but the kit would fit normally with the battery installed
The Autobahn 88 kit was professionally installed and modified by Raymond and staff at Silverstone Motors in Edmonton last year who do tons of custom work on jdm and other vehicles.
The replacement washer bottle now sits across the engine on the battery tray in this installation along with relocation of the antifreeze overflow container. The original position of the coolant overflow could also be maintained by turning the bottle 90 deg sideways.
It was passed along in this forum that a stealth setup for an h20 injection system or i/c spray or w/w bottle could be had using a lhd usdm sentra w/washer container [used in the mirror position to stock jdm rhd gtir location] to save even more space and better concealed. Might be a spot for an extra reservoir in a stock gtir with tmic too.
The plastic bumper cover was already cut-out below the steel bumper from a previous fmic install [long gone ..never made it to canada] but given the large size of the kit's fmic more trimming was required to fit at the lower corners.
The skidplate previously under the engine was removed along with some remote control fog lights seen in some other gallery images. http://www.canadagtir.com/gallery/user/91gtirgrey/gtir-winter-roadjpg
The stock skidplate could be re-adapted with some modification to the install.
There was also a laguna spoiler that came with the car but given road clearance with the d2 shocks it was removed previously.
Some ducting could be done to make most of the air go through the intercooler rather than spilling off the sides; and, as can be seen in another gallery pic here a bugscreen would have been useful on at least one day. http://www.canadagtir.com/gallery/user/91gtirgrey/back-road-bugs-and-dust-north-central-ab
As might be seen from a top-down center view the shining chrome fmic sits straight up/down about 1" from the radiator. Some move the a/c condensor and tilt the intercooler as noted on another forum.
The turbo's compressor outlet flange is partially seen at the top of the above image. The tightest part of the a'88 kit is about 6" above that flange seen in the pic below where the exhaust heat shield and fmic piping just contact at one spot.
[Another view of the contact point is seen looking from the right side a couple of pics above.]
There's enough flex in the heat shield so no issue really. The i/c tube near the heat could likely be wrapped with insulation tape but hasn't yet.
The oil dipstick ...
is made less accessible especially under hot engine conditions; anyways, it's best checked when the engine is cold to begin with.
The e-bay a'88 kit's been modified from 'as shipped' by cutting a short section so a 'T' could be added to install an aftermarket blow off valve;
right click the mouse and select view image to see the whole picture below and then zoom appropriately as desired...
The "T" for the BOV was cut and flared; it holds stock boost.
By way of comparison, below's the rolled bead the kit itself uses, no leaks at stock boost. fwiw The clamps seen elsewhere provided with the kit are good enough at stock pressure as well.
The Greddy Type RZ mounted on the flange of the "T" has a gunmetal color finish on the bell and horn parts.
It's marketed as a 'limited edition' but basically is the RS and there are tons of knockoffs of the design, some an improvement, some cheap. Whatever the choice, our cars seem to have a problem with getting a good vacuum source; if not then the valve doesn't work well. [Check out the pics and comments below for modifications done to the bov itself]
Seen below, Raymond added extra bracing to the long horizontal section from the turbo outlet running to the right side hole through the bodywork.
The brace can be dispensed with if the hole is slightly enlarged as regards location of the pipe centered down the hole, but, it's also a support in case persons working on the vehicle can lean on the long tube putting stress at the joint by the turbo. There's a couple inch longs tab on the tube as supplied that normally locates the horizontal part of the tube to the engine near the right front corner.
On the left side the position of the hose clamp allowed for more support for the system by using the threaded part of the clamp and a rubber hose with 1 1/2" round bushing wedged on that rests on the chassis.
It flexes a bit resting on the bodywork but is a solid enough support that dampens vibrations.
As BOV's can be a bit noisy at times, i may simply re-route the bov to re-circulate the exhaust by switching the tubes around 180 and getting a bov re-circulation adapter to re-hook to the intake. [One was found inexpensively on ebay]
There's lots of room in the engine bay now with a larger capacity battery now in the trunk, but, i should note that was not essential for the fmic install and it could have remained up front in the stock location if desired with the A88 kit.
fwiw: The larger capacity rear mounted conventional battery in the un-vented box also helps the weight distribution a bit in addition to clearing front space and having lots of amp-hours for winter.
As the box is un-vented, I suppose if charging a depleted battery, it might be good to keep a rear window open and not cause ignition of h2, but no poisonous gases detected so far. lol. Best shift the battery out for storage purposes.
The large black leatherette felt-lined/zippered bag that was originally intended for a nissan moonroof or somesuch if can be seen is embossed with 'NISSAN' at the top. It was found 'free' in the wrecking yard. The Nissan storage bag keeps the trunk stuff a bit more tidy; i'll be looking to find another one sometime.
The raised parcel shelf above is a similar find, it being from some other nissan wreck and it sorta fits with help on closing. Not shown and temporarily removed, there was a 3/4" thick very heavy fibreboard panel that held a couple 3 way speakers mounted and amp suspended when bought. It was cut to fit just under the shelf.
Celm on this forum posted a lead on a source for fmic in the states.
I think in his installs he may have laid the i/c back at the top in his fmic installs without requiring cutting the bumper at the top, as in mine and the diy how to below.
I hope that helps!
The Youtube channel Mightycarmods episode 8 details the entire DIY version fmic installation on a gtir seen at http://www.youtube.com/watch?v=mqXpUzzWtQ8
plus lots of gtir specific stuff to see, enjoy :)
Noticed anything "funny" with the exchange rates and parts prices lately:
New Scarier Insider Information: http://www.youtube.com/watch?v=uPg4qTNTP-E
Save Real Money for your Nissan Pulsar Gtir Upgrades!
http://www.canadagtir.com/gallery/user/91gtirgrey/wont-last-long-buy-physical-silver-now
***** "May you live in interesting times."
Thanks! :) It a Greddy Type RZ Limited Edition BOV SSQV Blow Off Valve, 40 mm, p/n #11201663 via Silverstone Motors' sourced locally. They're on ebay at about $225usd ... the 'T' fitting/hose/clamp for mounting the bov was extra and modified by cutting.
The product advert intro said:
"This limited edition Type-RZ blow off valve is based on the ever popular performance and sound of the Type RS, but provide a more subtle exclusive and stealthier look with a black chrome and Gunmetal-anodized finish. The adjustable dual springs, excellent valve to diaphragm ratio, and ability to blow off to the atmosphere or re-route into the intake track, makes the Type-RZ idea for most turbocharged applications in the 100-450hp range"
http://www.the370z.com/forced-induction/245-product-announcement-greddy-type-rz-blow-off-valve.html
A 29mm blow off valve outlet adaptor to re-circulate the blow off air via hose back to the intake worked out to 30 bucks delivered from usa. The factory site is:
http://www.greddy.com/products/turbochargers/blow-off-valves/ and there are tons of similar piece on ebay. The bag the ebay part arrived in had upc codes and 'RS BOV Attachment' #11900512.
I was sold on the compact Type-RZ which is very similar to it's predecessor the Greddy Type-RS. Like the RS type there are two springs [dual springs] in the RZ.
When compressor surge was still noted using the 'limited edition' RZ, some guys on the web went and removed the smaller spring to good effect, [no more flutter!] as heard on a couple youtube vids of an evo:
http://www.youtube.com/watch?v=HEhctwQtM3s&feature=channel
The second one following the removal of the spring has it all cleared up.
http://www.youtube.com/watch?v=aB7T5vjojrs&feature=channel
The process of removing the spring is very easy but please do take care when removing the screws to be gripping the two halves tightly as there is moderate spring pressure pushing the diaphragm inside. Watch your eyes vis-a-vis the springs flying loose.
Best save that smaller center spring somewhere safe for later if you want to run more more pressure ever. I'm reasonably sure there was not any coil binding going on within the dual spring setup, but all the pressure required to blow the valve was excessive with the two installed and stock single vacuum line hookup.
Removing the one spring from the GReddy Type-RZ Blow Off Valve made a difference in spring pressure by about roughly a third less. Fine tuning can now be done with the allan setscrew and locknut at the top of the BOV. Turn Left to loosen, righten to tighten and then have the BOV activate at higher pressure. The BOV was flipped around and moved closer to the intake to allow for re-circulation if desired following the removal of the spring. I haven't heard of anyone using just the smaller spring alone, or different spring combo's but it looks like there is room to experiment.
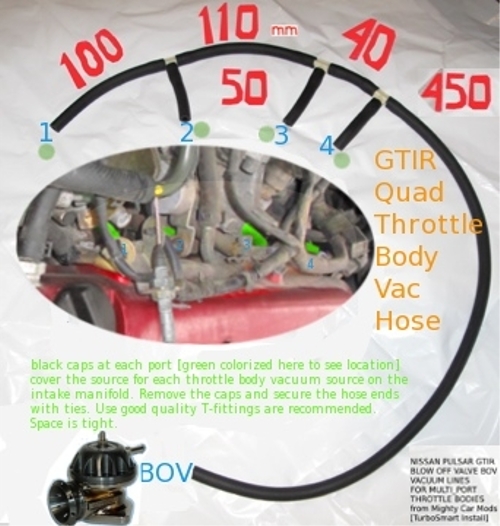
The problem of poor bov response and the reason the valve didn't work well, or any would for that matter, is usually a poor vacuum source. The valve should be easily adjustable via the top screw but didn't work for the gtir because of the quad throttle body setup doesn't provide for a good manifold vacuum pressure . Rather, draw a source from the base of the thottle bodies and join them 4>1. Details below.
Best to get some good barbed metal T-fittings... and use small plastic ties vs. clamps to secure the vac hose, as space is tight and the throttle mechanism is close.
fwiw: no clamps or ties were required at the throttle vacuum ports connection using stock boost and all's holding well.
Here's some pics of the 4>1 vac line as seen at mightycarmods Mighty Car Mods - Blow Off Valve GTIR Plumbing segment as installed on my car. The tube is COLORIZED to indicate the position in the photo.
The BOV works _way_ better than before now; much better than with just the removal of the small center spring alone leaving the larger in place. I kept the small spring out after the 4 >1 vac conversion. I may even try less spring pressure by swapping in the smallest spring for the larger one and if required dialing in the set screw to tighten the spring rate appropriately. More perhaps later.
The "How To" for the tubing is seen here: (SE01 EP09) http://www.youtube.com/watch?v=En91CuhPqjI
Here's the plan:
I'd tend to leave the 'extra' length intact even if extra to distance requirement because of possible pulse or manifolding effects in the vac pipe.
The stronger vac signal from the 4>1 vac source for the quad throttle bodies definitely does improve seat-of-the-pants performance response and helps protect the turbo compressor even more.
Re-circulation of the bov will hopefully raise a/f a bit on on deceleration. fwiw: You can hear the difference in lack of compressor surge immediately: No more WHooooHoooHooohoo,,, compressor flutter heard coming out the intake, but now, just a harsh whoosh sound just like airbrake systems discharge or like a whip cracking.
The bell shaped diffuser with the vents projects the sound vs. running air out without it screwed in, and the vents in the diffuser give it a bit more peaky sound which some enjoy and the design has been copied widely.
Cheap knockoffs of well known valves can be common and may be the source of problems, but looking for examples the only one was a rusted valve where the guy put his car away for the winter with a wet engine bay, or owner errors of some kind. Alternatively some knockoffs can actually exceed the originals in terms of quality materials and design improvements. Some parts could swap out directly.
Below is a pic of similarly appearing valves of different quality.
There are some virtually identical and the points of difference are discussed here:
The differces can be noted visually in most cases.
The original manufacture's spec can sometimes be exceeded by some design copies, i.e. diaphragm material quality upgrades for performance and durability improvement:
Other popular brands have been copied as also posted on the forum, HKS information can be found http://www.hksusa.com/info/?id=3646 as also linked elsewhere on this forum.
The HKS is a different design than the typical poppet valve and has some advantages. From what I've heard, the hks is great at eliminating leaks at idle by design and sounds a bit different than say the greddy or tial or turbosmart. The peaky sound at the start of flow on the hks bov exhaust sound you can hear on the youtube is from air slipping between the rubber and metal.
The greddy rz bov horn is drilled with 8 small vents around the edge that make it whistle a bit too. If the horn is unscrewed and removed the type-rz sounds a bit more ragged and not nearly as sharp and clear as with the horn, not unlike truck air brake discharge without the squeek.
The new style Tial unit I listened to on youtube recently was a huge new rotary unit that flowed 6% better and sounded even different than the rest. Size is a factor there.
Some tuning can be done with a bov as mentioned elsewhere. Using a stock recirculation valve and a pipe mounted aftermarket bov in conjunction could have some advantages to raise the point at which the turbo wastegate actuator functions and then the rpm of the turbine could be kept higher. If using the BOV to vent to atmosphere vs. opening the wastegate which would could cause the turbine to spool down. The wastegate actuation point could be regulated by a small valve bleeding vac/boost pressure. The bov spring pressure could be dialed in by turning any adjustment setscrew or maybe changing out or trimming a spring. It's pretty basic initially but could be very expensive if things go wrong such as turbine overspeed or tons of compressor surge or boost creep and detonation.
A comparison of some bov's all on the same type car can be heard on youtube http://www.youtube.com/watch?v=4zRWZvEu7lQ&feature=player_embedded
From what i can hear on the video, the greddy bov demonstrated could use the one spring modification too.
That compressor surge flutter has to go; so far so good with the RZ in my gtir with the one large spring intact and the small one removed.
Caution: please wear eye protection when messing with removing the valve hat or re-installing the springs for safety's sake, the bov springs are under a bit of pressure hold firmly while dismantling.
Noticed anything "funny" with the exchange rates and parts prices lately:
New Scarier Insider Information: http://www.youtube.com/watch?v=uPg4qTNTP-E
Save Real Money for your Nissan Pulsar Gtir Upgrades!
http://www.canadagtir.com/gallery/user/91gtirgrey/wont-last-long-buy-physical-silver-now
***** "May you live in interesting times."
good god. Thanks for all of the info, I was getting 2-3 emails a day from this site saying that your post had been updated! if you update it any more, make another post so I don't have to read a 3 page email and try to find the new addition of info lol.
LOL, Thanks for the comment! Just ignore the emails ... pay no attention and delete please, as noted, no reply is required lol! ...i was adding and changing things as i went and trying to adjust the pic displays in the comments section which was not working here for some reason.
There seems to be a problem with the photo displays in the comments section, on my fire fox 3.5.13 browser at least:
..most of the 'comments' images are truncated at the right side by the member name selection area ... EDIT:
I think i've figured out how it works to place images now, but my personal file still shows: "this user has not uploaded any gallery images" ...
LOL go figure.
Update:
To post within the column width, it's necessary to shorten the display of the 700px wide image down to 466px. This can be done still using the same 700px image as a source, but changing the 'width=xxx' and 'height=yyy' parameters.
Alternatively resize the image in a graphic program to fit.
Using the same image has lots of utility and changes to fit can be facilitated en masse with image placement using a word processor to edit a series of insert image text lines.
To see an example of that view the page source of http://www.canadagtir.com/forums/technical/misc-tech/rally-nissan-pulsar-gtir-nme-rnn14-group-n-manual-rally-record . Note the concatenated list that was generated from a single entry, duplicated ten times and edited to make a seris. Enjoy!
Noticed anything "funny" with the exchange rates and parts prices lately:
New Scarier Insider Information: http://www.youtube.com/watch?v=uPg4qTNTP-E
Save Real Money for your Nissan Pulsar Gtir Upgrades!
http://www.canadagtir.com/gallery/user/91gtirgrey/wont-last-long-buy-physical-silver-now
***** "May you live in interesting times."


what intercooler kit is this ? looks great btw
1992 nissan pulsar gti-r Black sold/1993 red/rusty parts car /1990 nissan pulsar gtir fully built vet with to much jam
Thanks. It's one of those thin walled light tube types from Hong Kong via Ebay branded "Autobahn88".
It uses an intercooler with 'fin and tube' type intercooler vs. the 'bar and plate' design. Both have advantages but either will usually do for most street applications without noticing any differences. Lots has been written of several forums on the pros and cons of each; i like the fin and tube for better airflow through to the rad.
Core size is 600mmx300mmx77mm ( 23.7 inch x 11.77 inch x 3.1 inch) ,
End to end it's 780mm and Inlet/Outlet 75mm (3 inch) O/D. Wt. 9kg on the vehicle.
The manufacturer claims an 'ultra low pressure drop 0.5-1psi at 23psi' (Normal Bar and Plate 2.8- 4 psi at 23 psi) and good to 650hp on the efficiency.
It's still good after a year only requiring normal clamp re-tightening. The three bolts at the turbo discharge joint were tightened with a combination of sockets and extension plus a short box end for one of them.
With the battery relocated, there was a lot more space available but the kit would fit normally with the battery installed
The Autobahn 88 kit was professionally installed and modified by Raymond and staff at Silverstone Motors in Edmonton last year who do tons of custom work on jdm and other vehicles.
The replacement washer bottle now sits across the engine on the battery tray in this installation along with relocation of the antifreeze overflow container. The original position of the coolant overflow could also be maintained by turning the bottle 90 deg sideways.
It was passed along in this forum that a stealth setup for an h20 injection system or i/c spray or w/w bottle could be had using a lhd usdm sentra w/washer container [used in the mirror position to stock jdm rhd gtir location] to save even more space and better concealed. Might be a spot for an extra reservoir in a stock gtir with tmic too.
The plastic bumper cover was already cut-out below the steel bumper from a previous fmic install [long gone ..never made it to canada] but given the large size of the kit's fmic more trimming was required to fit at the lower corners.
The skidplate previously under the engine was removed along with some remote control fog lights seen in some other gallery images. http://www.canadagtir.com/gallery/user/91gtirgrey/gtir-winter-roadjpg
The stock skidplate could be re-adapted with some modification to the install.
There was also a laguna spoiler that came with the car but given road clearance with the d2 shocks it was removed previously.
Some ducting could be done to make most of the air go through the intercooler rather than spilling off the sides; and, as can be seen in another gallery pic here a bugscreen would have been useful on at least one day. http://www.canadagtir.com/gallery/user/91gtirgrey/back-road-bugs-and-dust-north-central-ab
As might be seen from a top-down center view the shining chrome fmic sits straight up/down about 1" from the radiator. Some move the a/c condensor and tilt the intercooler as noted on another forum.
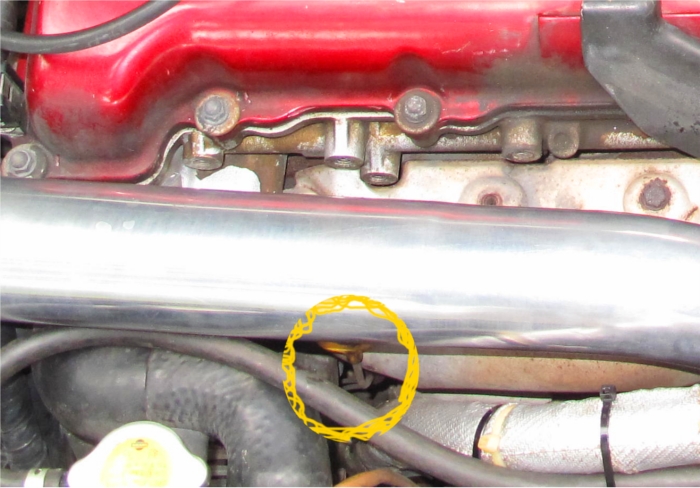
The turbo's compressor outlet flange is partially seen at the top of the above image. The tightest part of the a'88 kit is about 6" above that flange seen in the pic below where the exhaust heat shield and fmic piping just contact at one spot.
[Another view of the contact point is seen looking from the right side a couple of pics above.]
There's enough flex in the heat shield so no issue really. The i/c tube near the heat could likely be wrapped with insulation tape but hasn't yet.
The oil dipstick ...
is made less accessible especially under hot engine conditions; anyways, it's best checked when the engine is cold to begin with.
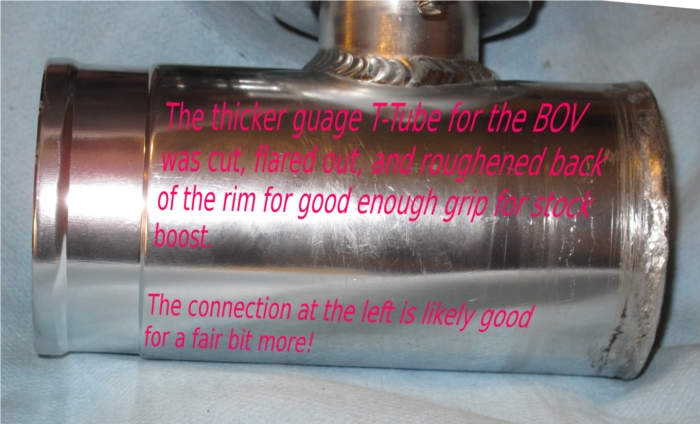
The e-bay a'88 kit's been modified from 'as shipped' by cutting a short section so a 'T' could be added to install an aftermarket blow off valve;
right click the mouse and select view image to see the whole picture below and then zoom appropriately as desired...
The "T" for the BOV was cut and flared; it holds stock boost.
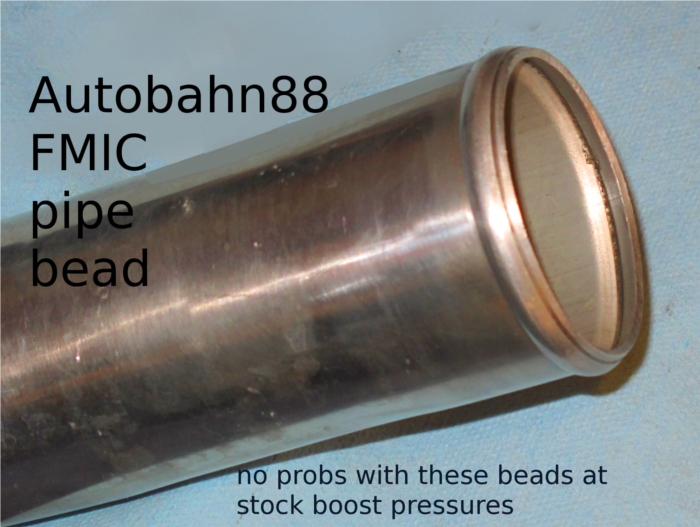
By way of comparison, below's the rolled bead the kit itself uses, no leaks at stock boost. fwiw The clamps seen elsewhere provided with the kit are good enough at stock pressure as well.
The Greddy Type RZ mounted on the flange of the "T" has a gunmetal color finish on the bell and horn parts.
It's marketed as a 'limited edition' but basically is the RS and there are tons of knockoffs of the design, some an improvement, some cheap. Whatever the choice, our cars seem to have a problem with getting a good vacuum source; if not then the valve doesn't work well. [Check out the pics and comments below for modifications done to the bov itself]
Seen below, Raymond added extra bracing to the long horizontal section from the turbo outlet running to the right side hole through the bodywork.
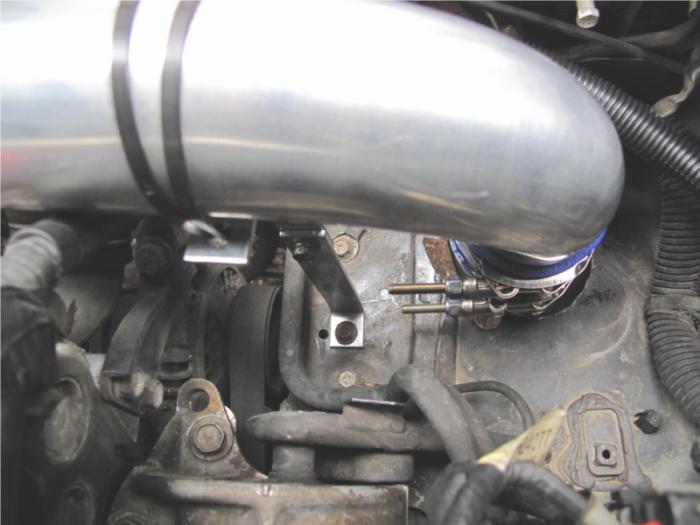
The brace can be dispensed with if the hole is slightly enlarged as regards location of the pipe centered down the hole, but, it's also a support in case persons working on the vehicle can lean on the long tube putting stress at the joint by the turbo. There's a couple inch longs tab on the tube as supplied that normally locates the horizontal part of the tube to the engine near the right front corner.
On the left side the position of the hose clamp allowed for more support for the system by using the threaded part of the clamp and a rubber hose with 1 1/2" round bushing wedged on that rests on the chassis.
It flexes a bit resting on the bodywork but is a solid enough support that dampens vibrations.
As BOV's can be a bit noisy at times, i may simply re-route the bov to re-circulate the exhaust by switching the tubes around 180 and getting a bov re-circulation adapter to re-hook to the intake. [One was found inexpensively on ebay]
There's lots of room in the engine bay now with a larger capacity battery now in the trunk, but, i should note that was not essential for the fmic install and it could have remained up front in the stock location if desired with the A88 kit.
fwiw: The larger capacity rear mounted conventional battery in the un-vented box also helps the weight distribution a bit in addition to clearing front space and having lots of amp-hours for winter.
As the box is un-vented, I suppose if charging a depleted battery, it might be good to keep a rear window open and not cause ignition of h2, but no poisonous gases detected so far. lol. Best shift the battery out for storage purposes.
The large black leatherette felt-lined/zippered bag that was originally intended for a nissan moonroof or somesuch if can be seen is embossed with 'NISSAN' at the top. It was found 'free' in the wrecking yard. The Nissan storage bag keeps the trunk stuff a bit more tidy; i'll be looking to find another one sometime.
The raised parcel shelf above is a similar find, it being from some other nissan wreck and it sorta fits with help on closing. Not shown and temporarily removed, there was a 3/4" thick very heavy fibreboard panel that held a couple 3 way speakers mounted and amp suspended when bought. It was cut to fit just under the shelf.
Celm on this forum posted a lead on a source for fmic in the states.
I think in his installs he may have laid the i/c back at the top in his fmic installs without requiring cutting the bumper at the top, as in mine and the diy how to below.
I hope that helps!
The Youtube channel Mightycarmods episode 8 details the entire DIY version fmic installation on a gtir seen at http://www.youtube.com/watch?v=mqXpUzzWtQ8
plus lots of gtir specific stuff to see, enjoy :)
Noticed anything "funny" with the exchange rates and parts prices lately:
New Scarier Insider Information: http://www.youtube.com/watch?v=uPg4qTNTP-E
Save Real Money for your Nissan Pulsar Gtir Upgrades!
http://www.canadagtir.com/gallery/user/91gtirgrey/wont-last-long-buy-physical-silver-now
***** "May you live in interesting times."
which bov are you using, where did you get it? looks good!
RNN14
Thanks! :) It a Greddy Type RZ Limited Edition BOV SSQV Blow Off Valve, 40 mm, p/n #11201663 via Silverstone Motors' sourced locally. They're on ebay at about $225usd ... the 'T' fitting/hose/clamp for mounting the bov was extra and modified by cutting.
The product advert intro said:
"This limited edition Type-RZ blow off valve is based on the ever popular performance and sound of the Type RS, but provide a more subtle exclusive and stealthier look with a black chrome and Gunmetal-anodized finish. The adjustable dual springs, excellent valve to diaphragm ratio, and ability to blow off to the atmosphere or re-route into the intake track, makes the Type-RZ idea for most turbocharged applications in the 100-450hp range"
http://www.the370z.com/forced-induction/245-product-announcement-greddy-type-rz-blow-off-valve.html
A 29mm blow off valve outlet adaptor to re-circulate the blow off air via hose back to the intake worked out to 30 bucks delivered from usa. The factory site is:
http://www.greddy.com/products/turbochargers/blow-off-valves/ and there are tons of similar piece on ebay. The bag the ebay part arrived in had upc codes and 'RS BOV Attachment' #11900512.
I was sold on the compact Type-RZ which is very similar to it's predecessor the Greddy Type-RS. Like the RS type there are two springs [dual springs] in the RZ.
When compressor surge was still noted using the 'limited edition' RZ, some guys on the web went and removed the smaller spring to good effect, [no more flutter!] as heard on a couple youtube vids of an evo:
http://www.youtube.com/watch?v=HEhctwQtM3s&feature=channel
The second one following the removal of the spring has it all cleared up.
http://www.youtube.com/watch?v=aB7T5vjojrs&feature=channel
The process of removing the spring is very easy but please do take care when removing the screws to be gripping the two halves tightly as there is moderate spring pressure pushing the diaphragm inside. Watch your eyes vis-a-vis the springs flying loose.
Best save that smaller center spring somewhere safe for later if you want to run more more pressure ever. I'm reasonably sure there was not any coil binding going on within the dual spring setup, but all the pressure required to blow the valve was excessive with the two installed and stock single vacuum line hookup.
Removing the one spring from the GReddy Type-RZ Blow Off Valve made a difference in spring pressure by about roughly a third less. Fine tuning can now be done with the allan setscrew and locknut at the top of the BOV. Turn Left to loosen, righten to tighten and then have the BOV activate at higher pressure. The BOV was flipped around and moved closer to the intake to allow for re-circulation if desired following the removal of the spring. I haven't heard of anyone using just the smaller spring alone, or different spring combo's but it looks like there is room to experiment.
The problem of poor bov response and the reason the valve didn't work well, or any would for that matter, is usually a poor vacuum source. The valve should be easily adjustable via the top screw but didn't work for the gtir because of the quad throttle body setup doesn't provide for a good manifold vacuum pressure . Rather, draw a source from the base of the thottle bodies and join them 4>1. Details below.
Best to get some good barbed metal T-fittings... and use small plastic ties vs. clamps to secure the vac hose, as space is tight and the throttle mechanism is close.
fwiw: no clamps or ties were required at the throttle vacuum ports connection using stock boost and all's holding well.
Here's some pics of the 4>1 vac line as seen at mightycarmods Mighty Car Mods - Blow Off Valve GTIR Plumbing segment as installed on my car. The tube is COLORIZED to indicate the position in the photo.
The BOV works _way_ better than before now; much better than with just the removal of the small center spring alone leaving the larger in place. I kept the small spring out after the 4 >1 vac conversion. I may even try less spring pressure by swapping in the smallest spring for the larger one and if required dialing in the set screw to tighten the spring rate appropriately. More perhaps later.
The "How To" for the tubing is seen here: (SE01 EP09) http://www.youtube.com/watch?v=En91CuhPqjI
Here's the plan:
I'd tend to leave the 'extra' length intact even if extra to distance requirement because of possible pulse or manifolding effects in the vac pipe.
The stronger vac signal from the 4>1 vac source for the quad throttle bodies definitely does improve seat-of-the-pants performance response and helps protect the turbo compressor even more.
Re-circulation of the bov will hopefully raise a/f a bit on on deceleration. fwiw: You can hear the difference in lack of compressor surge immediately: No more WHooooHoooHooohoo,,, compressor flutter heard coming out the intake, but now, just a harsh whoosh sound just like airbrake systems discharge or like a whip cracking.
The bell shaped diffuser with the vents projects the sound vs. running air out without it screwed in, and the vents in the diffuser give it a bit more peaky sound which some enjoy and the design has been copied widely.
Cheap knockoffs of well known valves can be common and may be the source of problems, but looking for examples the only one was a rusted valve where the guy put his car away for the winter with a wet engine bay, or owner errors of some kind. Alternatively some knockoffs can actually exceed the originals in terms of quality materials and design improvements. Some parts could swap out directly.
Below is a pic of similarly appearing valves of different quality.
There are some virtually identical and the points of difference are discussed here:
http://tw.myblog.yahoo.com/nissan-240sx/article?mid=509&prev=513&next=508
The differces can be noted visually in most cases.
The original manufacture's spec can sometimes be exceeded by some design copies, i.e. diaphragm material quality upgrades for performance and durability improvement:
Other popular brands have been copied as also posted on the forum, HKS information can be found http://www.hksusa.com/info/?id=3646 as also linked elsewhere on this forum.
The HKS is a different design than the typical poppet valve and has some advantages. From what I've heard, the hks is great at eliminating leaks at idle by design and sounds a bit different than say the greddy or tial or turbosmart. The peaky sound at the start of flow on the hks bov exhaust sound you can hear on the youtube is from air slipping between the rubber and metal.
The greddy rz bov horn is drilled with 8 small vents around the edge that make it whistle a bit too. If the horn is unscrewed and removed the type-rz sounds a bit more ragged and not nearly as sharp and clear as with the horn, not unlike truck air brake discharge without the squeek.
The new style Tial unit I listened to on youtube recently was a huge new rotary unit that flowed 6% better and sounded even different than the rest. Size is a factor there.
Some tuning can be done with a bov as mentioned elsewhere. Using a stock recirculation valve and a pipe mounted aftermarket bov in conjunction could have some advantages to raise the point at which the turbo wastegate actuator functions and then the rpm of the turbine could be kept higher. If using the BOV to vent to atmosphere vs. opening the wastegate which would could cause the turbine to spool down. The wastegate actuation point could be regulated by a small valve bleeding vac/boost pressure. The bov spring pressure could be dialed in by turning any adjustment setscrew or maybe changing out or trimming a spring. It's pretty basic initially but could be very expensive if things go wrong such as turbine overspeed or tons of compressor surge or boost creep and detonation.
A comparison of some bov's all on the same type car can be heard on youtube http://www.youtube.com/watch?v=4zRWZvEu7lQ&feature=player_embedded
From what i can hear on the video, the greddy bov demonstrated could use the one spring modification too.
That compressor surge flutter has to go; so far so good with the RZ in my gtir with the one large spring intact and the small one removed.
Caution: please wear eye protection when messing with removing the valve hat or re-installing the springs for safety's sake, the bov springs are under a bit of pressure hold firmly while dismantling.
Noticed anything "funny" with the exchange rates and parts prices lately:
New Scarier Insider Information: http://www.youtube.com/watch?v=uPg4qTNTP-E
Save Real Money for your Nissan Pulsar Gtir Upgrades!
http://www.canadagtir.com/gallery/user/91gtirgrey/wont-last-long-buy-physical-silver-now
***** "May you live in interesting times."
good god. Thanks for all of the info, I was getting 2-3 emails a day from this site saying that your post had been updated! if you update it any more, make another post so I don't have to read a 3 page email and try to find the new addition of info lol.
RNN14
LOL, Thanks for the comment! Just ignore the emails ... pay no attention and delete please, as noted, no reply is required lol! ...i was adding and changing things as i went and trying to adjust the pic displays in the comments section which was not working here for some reason.
There seems to be a problem with the photo displays in the comments section, on my fire fox 3.5.13 browser at least:
..most of the 'comments' images are truncated at the right side by the member name selection area ...
EDIT:
I think i've figured out how it works to place images now, but my personal file still shows: "this user has not uploaded any gallery images" ...
LOL go figure.
Update:
To post within the column width, it's necessary to shorten the display of the 700px wide image down to 466px. This can be done still using the same 700px image as a source, but changing the 'width=xxx' and 'height=yyy' parameters.
Alternatively resize the image in a graphic program to fit.
Using the same image has lots of utility and changes to fit can be facilitated en masse with image placement using a word processor to edit a series of insert image text lines.
To see an example of that view the page source of http://www.canadagtir.com/forums/technical/misc-tech/rally-nissan-pulsar-gtir-nme-rnn14-group-n-manual-rally-record . Note the concatenated list that was generated from a single entry, duplicated ten times and edited to make a seris. Enjoy!
Noticed anything "funny" with the exchange rates and parts prices lately:
New Scarier Insider Information: http://www.youtube.com/watch?v=uPg4qTNTP-E
Save Real Money for your Nissan Pulsar Gtir Upgrades!
http://www.canadagtir.com/gallery/user/91gtirgrey/wont-last-long-buy-physical-silver-now
***** "May you live in interesting times."